

Car painting is more than just an aesthetic choice—it's an essential part of maintaining a vehicle's integrity and ensuring its longevity. Whether you're restoring an old classic, customizing your ride, or simply refreshing the factory finish, painting a car requires careful preparation, the right tools, and a solid understanding of the process. In this article, we’ll break down the steps involved in car painting, highlight important techniques, and provide some tips to help you achieve a professional-looking finish.
1. Why Car Painting is Important
The paint on your car serves more purposes than just making it look good. It acts as a protective layer that shields the vehicle from the elements, preventing rust and corrosion caused by moisture, road salts, and chemicals. Moreover, a fresh coat of paint can increase the resale value of the vehicle and can even boost its overall appearance and appeal. Whether you’re looking to repair damage, customize your vehicle, or just give it a fresh new look, proper painting is a crucial part of car maintenance.
2. Preparing the Surface: The Key to a Long-Lasting Finish
Before diving into the painting process, it's important to properly prepare the surface. A good paint job starts with clean, smooth, and well-prepped surfaces. Here are the essential steps involved:
Cleaning and Degreasing
The first step in any car painting project is cleaning the car thoroughly. Dirt, oil, and debris can interfere with the bonding of the paint to the surface. Wash the car with soap and water, then use a degreaser to remove any oils or residues. Afterward, dry the vehicle completely.
Sanding the Surface
Once clean, sanding the car’s surface is essential for creating a smooth base for the paint to adhere to. If you're repainting a car, you'll need to sand off the old paint and any imperfections like rust or dents. Use a fine-grit sandpaper to sand the body panels and ensure that any uneven surfaces are smoothed out. For cars with heavy rust or deep scratches, more aggressive sanding may be necessary.
Priming
After sanding, apply a coat of primer. Primer helps paint adhere better to the car's surface, improves durability, and ensures a uniform finish. Choose a primer that is compatible with the type of paint you're using (e.g., epoxy or urethane primer). Allow the primer to dry fully before moving to the next step.
3. Choosing the Right Paint for Your Car
Selecting the correct paint is crucial for achieving the best results. Automotive paints come in a variety of types, including acrylic enamel, urethane, and epoxy-based paints. Each type offers different characteristics in terms of durability, ease of use, and finish.
Acrylic Enamel Paint
Acrylic enamel is a popular choice for beginners because it's relatively easy to apply and provides a smooth, glossy finish. However, it can take a long time to cure, and may not be as durable as other types of paint.
Urethane Paint
Urethane paint is a higher-end option used for professional-grade finishes. It’s known for its durability and resistance to weather, making it perfect for long-term protection. Urethane paints can also offer a deeper, more vibrant finish.
Basecoat-Clearcoat System
Many modern car manufacturers use a basecoat-clearcoat system, which involves applying a base color coat followed by a clear topcoat. This system offers excellent depth and shine, while also providing protection against UV rays and scratches.
4. The Car Painting Process: Step-by-Step
Once you've prepared the car and selected your paint, it’s time to start the actual painting process. Here's a step-by-step guide:
Step 1: Masking and Taping
Use painter's tape and masking paper or plastic to cover areas that you don’t want to paint, such as windows, tires, trim, and lights. Be thorough and ensure that all gaps and edges are properly sealed.
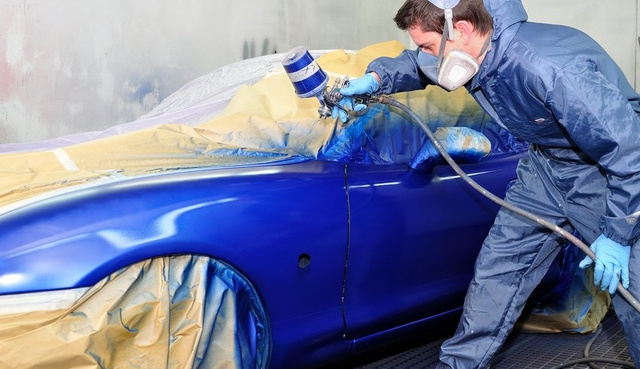
Step 2: Applying the Base Coat
Begin spraying the base coat (the color layer) using a spray gun or aerosol cans. Hold the spray gun about 6 to 8 inches from the surface, and apply multiple thin layers rather than one thick coat. Allow each coat to dry before applying the next one. Typically, two to three layers of basecoat will be sufficient.
Step 3: Applying the Clear Coat
After the base coat is dry, apply the clear coat to protect the color and add a glossy finish. Again, apply multiple thin layers of clear coat, ensuring that each layer dries before applying the next. This step is crucial for giving your car that showroom-quality finish.
Step 4: Drying and Curing
After all layers are applied, allow the paint to fully dry and cure. This can take anywhere from a few hours to a few days, depending on the type of paint used. Be sure to follow the manufacturer’s instructions for drying times.
5. Tips for a Professional-Looking Finish
Achieving a flawless car paint job requires patience, attention to detail, and some practice. Here are a few tips to ensure a smooth, professional-looking finish:
- Work in a dust-free environment: Dust and debris can ruin a fresh coat of paint. Ideally, paint your car in a well-ventilated area, such as a spray booth or a clean garage.
- Use quality tools: Invest in a good-quality spray gun, respirator, and other tools to ensure a smooth application.
- Take your time: Don’t rush the process. Apply several thin coats rather than a few thick ones, and allow each layer to dry fully before moving on.
- Polish and buff: After the paint has cured, polish and buff the surface to remove any imperfections and give your car that high-gloss finish.
Conclusion
Car painting is both an art and a science, requiring a combination of proper preparation, the right materials, and patience. Whether you're doing it yourself or entrusting the job to professionals, understanding the process will help you achieve the best results. With the right approach, you can transform your car into a visually stunning and well-protected vehicle that stands out on the road.
